

Hotline: 0902 360 448 / 0909 535 348

Danh mục sản phẩm
Sản phẩm nổi bật
.jpg)

.jpg)

.jpg)
Access Statistics
Làm Màn - gắn interlining
Interlining, đôi khi được gọi là gạch chân, là kỹ thuật sử dụng thêm một lớp hoặc nhiều lớp vải phía sau vải thời trang lựa chọn của bạn để thay đổi các đặc tính của nó.
Không giống như giao diện, mà được sử dụng trong các khu vực nhỏ như cổ áo, tay áo và facings để hỗ trợ thêm và sức mạnh, interlining là toàn bộ một bảng điều khiển cắt trong một lớp riêng biệt của vải và đặt sang bên trái của vải chính. Nó có thể được kết hợp để vải nhưng thường đặt tay và sử dụng trong thế giới thời trang cao cấp để cải thiện kết thúc của một may.
Các công việc phụ có liên quan trong việc đưa ra một may với một interlining được phản ánh trong thời gian thi công và chi phí. Cũng như sự hiểu biết lý do tại sao bạn sẽ sử dụng một interlining, bạn cần phải biết những gì các loại vải để sử dụng và làm thế nào để lựa chọn chúng. Có rất nhiều lý do để thêm một interlining - ví dụ, thêm cơ thể hoặc sâu hoặc ngăn ngừa vết nhăn - và đây là một hướng dẫn để giúp bạn có những lựa chọn tốt nhất.
Khi bạn mua một mẫu giấy thương mại, chỉ dẫn cho interfacings thường được bao gồm. Interlining chi tiết, tuy nhiên, không thường được công bố, vì vậy sử dụng hướng dẫn dưới đây để chọn các vật liệu thích hợp nhất cho thiết kế của bạn và kết hợp nó với vải của bạn với các phương pháp step-by-step hiển thị ở đây.
A. Calico tẩy trắng: Một interlining lý tưởng để thêm một lượng nhỏ trọng lượng và kiểm soát cho một ánh sáng, vải bay-đi.
B. Satin lót: Sử dụng satin để thêm trọng lượng phía sau mặt vải.
C. bông tấm: Đối với các loại vải vừa cân, bộ trải giường là một interlining hữu ích để thêm chiều sâu và trọng lượng.
D. nóng chảy interfacing: Đây là có sẵn trong độ khác nhau, rất hữu ích để hỗ trợ các loại vải dệt thưa rằng nếu không sẽ làm sáng tỏ.
E. Muslin: Sử dụng muslin với dệt lỏng lẻo của mình để thêm cơ thể và trọng lượng.
F. Silk charmeuse: Sử dụng để cải thiện chất lượng của vải che chắn bề mặt.
G. Lining: Đối với một, hiệu quả chất lỏng nhẹ nhàng hơn, sử dụng acetate lót. Trọng lượng của nó giúp làm cho vải treo tốt.
H. Net: Sử dụng net khi bạn muốn có một interlining cứng để thêm cấu trúc.
I. Silk organza: Its strength and crisp nature make it ideal for supporting fabric without adding any depth.
J. Cotton lawn: Use lawn for backing silk because the fibres adhere to each other and hold the silk and cotton together.
In some cases, it is necessary to use more than one interlining, since one does not have enough effect on its own. For example, when using a fine fabric for a full skirt it may need density, additional body and prevention of creasing. The answer is to back first with a cotton lawn to overcome the translucency of the fabric and then a dress net to add body and encourage creases to drop out. Another case in which more than one interlining is required is where a fine soft fabric is used to make a dress and jacket suit. The dress may need one type of interlining to allow it to drape or not seat, while the jacket will require additional body and strength to support the structure of a jacket. Each project you tackle will be different.
Two interlinings are used when one is difficult to sew. An example of this is on a stiff corset or bodice that fits very closely to the body. Cut the bodice panels in the outer fabric (cotton lawn is a good option) and collar and cuff canvas. Cut the seam allowances off the stiff canvas and centre the canvas on the cotton lawn. Sew around the outer edge of the canvas, leaving a 1.5cm (5⁄8in) seam allowance on the cotton lawn. Place this combined layer to the wrong side of the dress fabric, stitching the layers together within the seam allowance. When the three layers are joined, you can sew just outside the stiff canvas on the sewing line through the softer fabrics.
When making a slim-fitting skirt or bodice that will shape to the body, it is important that the two layers are joined carefully so they fit well and give a smooth finish. The interlining is fractionally closer to the body than the main fabric so it will be a tiny bit smaller. If both layers were made up in exactly the same size, the under layer would crumple.
TIP When adding an interlining to a large panel that does not fit closely to the body – for example, a full skirt, there is no need to account for the small difference in size of the panels. In this case, just place the interlining and fabric together with wrong sides facing and smooth out any wrinkles. Pin around the outside and machine tack the layers together.
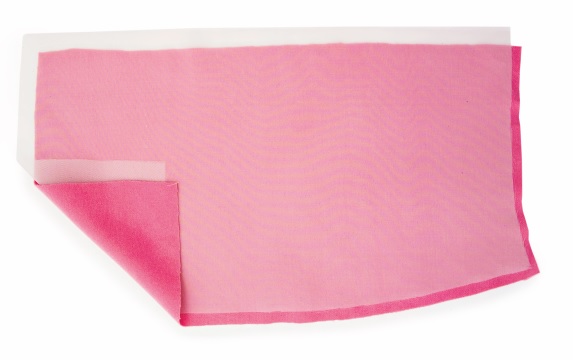
1. Cut each panel in main fabric and in an appropriate interlining fabric.
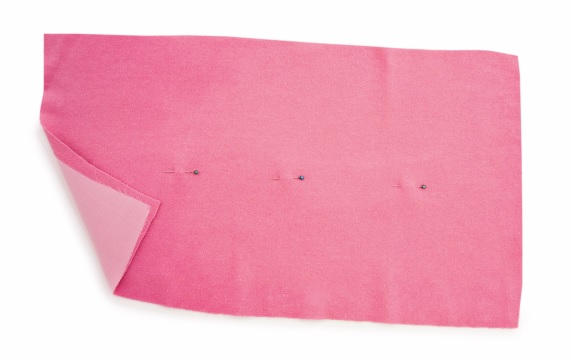
2. Lay the interlining on the work surface with the main fabric over it, right side up. Smooth the two layers out so there are no wrinkles and set a line of pins through the middle, catching both layers.
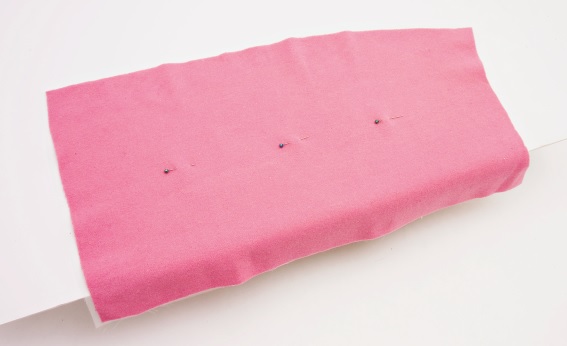
3. Drop one edge of the panel off the end of the work surface to mimic the shape of the body, which is cylindrical not flat. (You may find it easier to work at an ironing board as this is often a more comfortable height.)
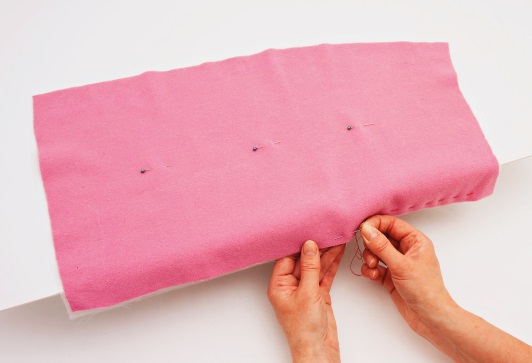
4. Hand-tack the edges together within the seam allowances, making sure the two layers lie naturally. The edges may not be level, but this is correct, and the curve of the body makes the interlining layer very slightly smaller. Keep turning the panel 90 degrees to complete all four outside edges.
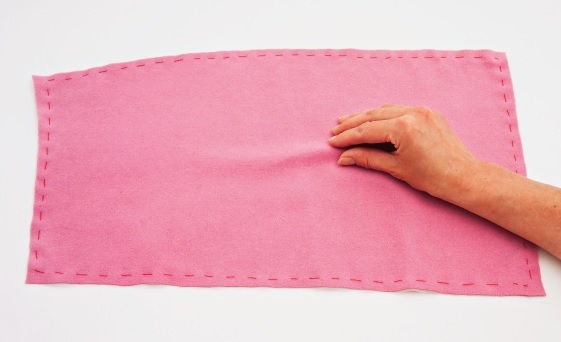
5. When the layers are sewn together, place them flat on the work surface. You will notice that there is a slight bubble demonstrating that the upper fabric is larger than the interfacing below. Treat them as one piece as you construct the garment.