

Hotline: 0902 360 448 / 0909 535 348

Product Categories
Hot Products
.jpg)
.jpg)

.jpg)
Access Statistics
Making drapes - attaching the interlining
Interlining, sometimes referred to as underlining, is the technique of using an additional layer or layers of fabric behind your chosen fashion fabric to change its characteristics.
Unlike interfacing, which is used in small areas such as collars, cuffs and facings to add support and strength, interlining is an entire panel cut in a separate layer of fabric and placed to the wrong side of the main fabric. It may be fused to the fabric but is more commonly hand placed and used in the couture world to improve the finish of a garment.
The extra work involved in making a garment with an interlining is reflected in the construction time and cost. As well as understanding why you would use an interlining, you need to know what fabrics to use and how to choose them. There are many reasons to add an interlining – for example, adding body or depth or preventing creasing – and here is a guide to help you make the best choices.
When you buy a commercial paper pattern, instructions for interfacings are normally included. Interlining details, however, are not normally stated, so use the guide below to choose the most appropriate material for your design and combine it with your fabric with the step-by-step method shown here.
A. Bleached calico: An ideal interlining to add a small amount of weight and control to a light, fly-away fabric.
B. Satin lining: Use satin to add weight behind the surface fabric.
C. Cotton sheeting: For medium-weight fabrics, sheeting is a useful interlining for adding depth and weight.
D. Fusible interfacing: These are available in different weights and are useful to support loosely woven fabrics that would otherwise unravel.
E. Muslin: Use muslin with its loose weave to add body and weight.
F. Silk charmeuse: Use this to improve the draping qualities of the surface fabric.
G. Lining: For a softer, fluid effect, use acetate lining. Its weight helps to make fabrics hang well.
H. Net: Use net when you want a stiff interlining to add structure.
I. Silk organza: Its strength and crisp nature make it ideal for supporting fabric without adding any depth.
J. Cotton lawn: Use lawn for backing silk because the fibres adhere to each other and hold the silk and cotton together.
In some cases, it is necessary to use more than one interlining, since one does not have enough effect on its own. For example, when using a fine fabric for a full skirt it may need density, additional body and prevention of creasing. The answer is to back first with a cotton lawn to overcome the translucency of the fabric and then a dress net to add body and encourage creases to drop out. Another case in which more than one interlining is required is where a fine soft fabric is used to make a dress and jacket suit. The dress may need one type of interlining to allow it to drape or not seat, while the jacket will require additional body and strength to support the structure of a jacket. Each project you tackle will be different.
Two interlinings are used when one is difficult to sew. An example of this is on a stiff corset or bodice that fits very closely to the body. Cut the bodice panels in the outer fabric (cotton lawn is a good option) and collar and cuff canvas. Cut the seam allowances off the stiff canvas and centre the canvas on the cotton lawn. Sew around the outer edge of the canvas, leaving a 1.5cm (5⁄8in) seam allowance on the cotton lawn. Place this combined layer to the wrong side of the dress fabric, stitching the layers together within the seam allowance. When the three layers are joined, you can sew just outside the stiff canvas on the sewing line through the softer fabrics.
When making a slim-fitting skirt or bodice that will shape to the body, it is important that the two layers are joined carefully so they fit well and give a smooth finish. The interlining is fractionally closer to the body than the main fabric so it will be a tiny bit smaller. If both layers were made up in exactly the same size, the under layer would crumple.
TIP When adding an interlining to a large panel that does not fit closely to the body – for example, a full skirt, there is no need to account for the small difference in size of the panels. In this case, just place the interlining and fabric together with wrong sides facing and smooth out any wrinkles. Pin around the outside and machine tack the layers together.
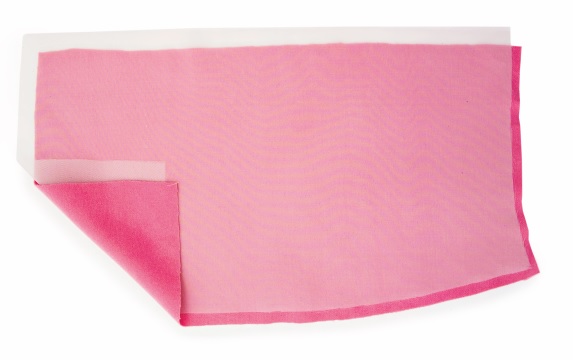
1. Cut each panel in main fabric and in an appropriate interlining fabric.
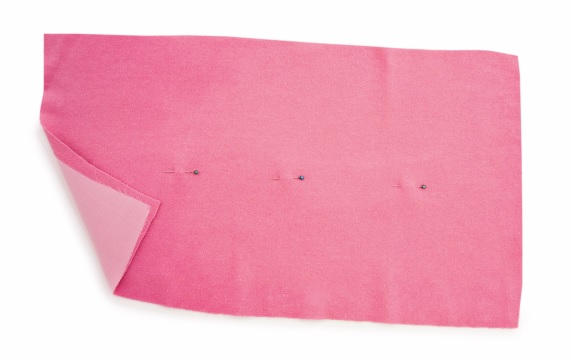
2. Lay the interlining on the work surface with the main fabric over it, right side up. Smooth the two layers out so there are no wrinkles and set a line of pins through the middle, catching both layers.
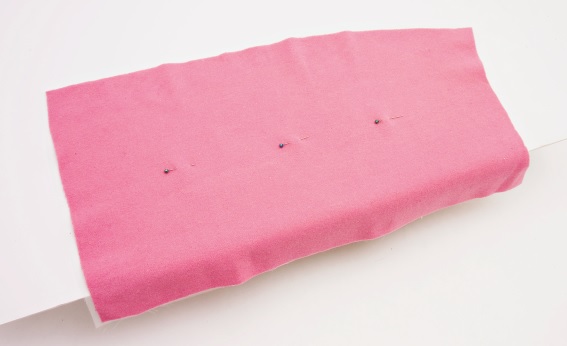
3. Drop one edge of the panel off the end of the work surface to mimic the shape of the body, which is cylindrical not flat. (You may find it easier to work at an ironing board as this is often a more comfortable height.)
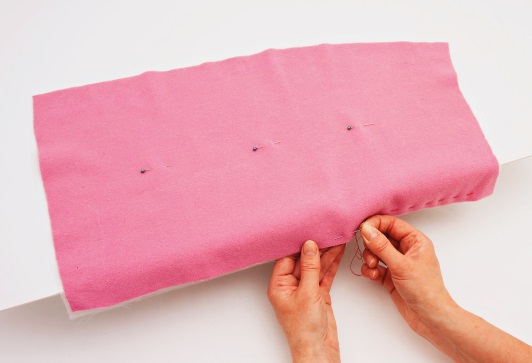
4. Hand-tack the edges together within the seam allowances, making sure the two layers lie naturally. The edges may not be level, but this is correct, and the curve of the body makes the interlining layer very slightly smaller. Keep turning the panel 90 degrees to complete all four outside edges.
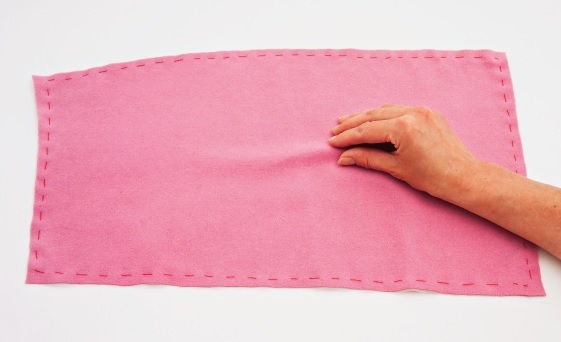
5. When the layers are sewn together, place them flat on the work surface. You will notice that there is a slight bubble demonstrating that the upper fabric is larger than the interfacing below. Treat them as one piece as you construct the garment.